
How EVLONGHAUL Plans Your Charge Stops
Last updated: August 24, 2026
When you plan a trip on EVLONGHAUL, the planner takes your route, your vehicle, and your charge settings and turns them into a list of specific charging stops. This page explains exactly how it does that (the assumptions, the math, and the data sources) and, just as important, what the planner cannot know. Every number it shows you is an estimate built from public data. Treat it that way.
Where the vehicle numbers come from
Vehicle range, efficiency, and battery data come from the EPA's fueleconomy.gov catalog: as of August 2026, 1,545 battery-electric model-year entries from 2011 onward, covering 811 distinct models across 41 makes. Where the EPA does not publish a battery size, EVLONGHAUL estimates it from the EPA range and efficiency figures and marks it with a "≈" so you know it is derived, not official. Plug types are curated by hand, because the EPA publishes no plug data at all.
The 8% buffer and how legs are budgeted
The planner never budgets against your car's full rated range. Instead:
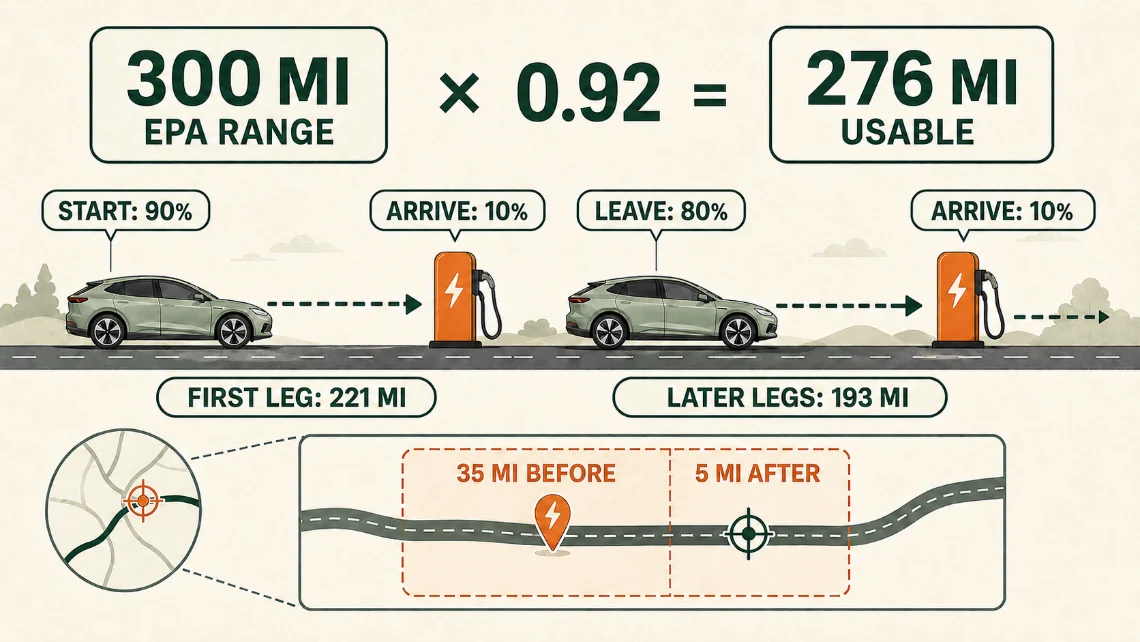
- Usable range = EPA rated range × 0.92. That flat 8% buffer accounts for the fact that sustained highway speeds and ordinary weather usually deliver less than the EPA combined figure.
- The first leg is budgeted as your starting charge percentage minus your minimum arrival percentage, applied to that usable range. If you start at 90% and want to arrive with at least 10%, the first leg gets 80% of your usable range.
- Every later leg assumes you charge to 80% at each stop (the practical ceiling for DC fast charging, since charging slows sharply above that), so later legs are budgeted as 80% minus your arrival reserve.
The 8% buffer is deliberately simple. It is not a physics model, and it will not cover a hard winter headwind or a long mountain climb. More on that below.
If you add an overnight stay to the route, the planner does not assume you charged there. Lodging is not a charging stop, and it cannot know whether your hotel has a working charger you can actually get to, so by default you leave the next morning with the charge you arrived with the night before. Tick "Charging available overnight" on that stop and tell it what you will reach, and it budgets the next leg from that instead. The default direction is deliberate: assuming a charge that never happens is the one error that strands you.
How each stop gets placed
The planner tracks your energy budget mile by mile along the route. Where the budget would run out, it looks for a real station in a window from 35 miles before that point to 5 miles after it. The window skews early on purpose: charging a little sooner than strictly necessary is cheap insurance, while pushing past your budget is not.
Within that window, the planner prefers stations with 100 kW or faster hardware, and among those it picks the one farthest along your route so you cover the most ground per stop. The next leg's budget then starts from the station's actual position on the route, not the theoretical target, so small placement differences never compound into an optimistic plan.
If no station fits the window at all, the planner does not invent one. It marks a dashed "suggested charge area" instead, which is your cue to research that stretch yourself before you commit to it.
The route line you see drives through every planned stop, including any detour off the highway, and the trip's total miles, drive time, and per-leg distances come from that real charger-to-charger route. Stop selection itself still happens along the direct route's corridor; if a detour makes a leg longer than your energy budget covers, the itinerary flags that leg with a "may exceed range" warning rather than silently assuming it works.
Where the station data comes from
Stations come from the U.S. Department of Energy's Alternative Fuels Data Center, looking at stations within about 5 miles of your route. The planner filters to public, non-call-ahead stations that have your connector on DC fast hardware of known power, or J1772 equipment if you have chosen a Level 2-only trip. When the AFDC lookup is unavailable, Open Charge Map serves as the fallback source.
You can narrow the search with the charger speed filter (any DC fast (50 kW+), 150 kW+, 250 kW+, or Level 2 only) and by connector: CCS, NACS, CHAdeMO, or J1772. If those terms are unfamiliar, start with our guide to charging levels and what the kW numbers mean.
How charge times are estimated
The charge-time figure at each stop is the energy that leg actually needs, divided by whichever is slower: your car's average DC charging power, or 70% of the station's rated power. Energy comes from the EPA combined efficiency rating for your exact vehicle, so a 90-mile leg shows a shorter stop than a 210-mile one.
Your car's charging power comes from the manufacturer's published 10-80% fast-charge time and usable battery capacity, which together give the average rate it sustains across a real session. That matters more than the peak number on a spec sheet, because fast charging tapers: a "350 kW" station will not average anywhere near 350 kW, and neither will your car. Where a manufacturer publishes no fast-charge figure, we show an estimate for that vehicle's platform, marked with a ≈.
One caveat worth knowing before you plan around these numbers. Manufacturers do not all test the same way, and most do not say how they tested at all. Porsche, for instance, publishes its charging time at 15°C, while other makers state no temperature. So treat these as a good-conditions baseline rather than a promise: a cold battery, cold weather, or a charger you are sharing will all make your real stop longer. Your state of charge on arrival matters too, and the planner does account for that: it assumes you charge only as much as the next leg needs, up to 80%.
Routes, networks, and pin colors
The planner compares up to three alternate driving routes. If you select a preferred charging network, it favors the route that keeps the most stops on that network. Sometimes a slightly longer drive is worth a more consistent charging experience.
On the map, each charge-stop pin shows its stop number and is color-coded by the station's rated charging speed:
- Green: 250 kW and up, the fastest hardware on the route.
- Orange: 100 to 249 kW, the workhorse fast-charging tier.
- Dark: under 100 kW, Level 2, or unlisted power; plan for a longer stop.
- Dashed "?": no charger found; a suggested charge area you must plan yourself.
How far each station sits off your route shows up two ways: as text on its itinerary entry, and in the shape of the route line itself, which detours to the charger and back.
What the planner does not know
Honesty matters more than polish here, so plainly:
- No live charger status. The planner has no real-time availability, occupancy, or outage data. A station can be full, offline, or behind a locked gate, and the plan will not reflect it. Check the charging network's own app before you rely on any single stop.
- No weather model. Cold, heat, wind, and rain all cut range, and winter can cost you far more than the 8% buffer covers. See how winter affects EV range before a cold-season trip.
- No elevation model. A long climb burns range faster than flat ground; the planner treats every mile the same.
- No driving-style model. Speed, load, roof boxes, and towing all change consumption, and the planner assumes none of them.
None of this makes the plan useless. It makes it a starting point. Leave yourself margin, confirm your stops the day you drive, and carry a backup option for any leg that depends on a single station. Our EV road trip checklist walks through exactly what to verify before you leave. To watch this whole method applied end to end, Chicago to Atlanta in an EV walks a 720-mile day stop by stop.